First, capture is important, perhaps the most important step. I've placed the negative on the glass of the scanner just so we can get a clearer picture of what is what and where in levels.
The first step in this is always scan in 16 bit ... you can use greyscale or colour but you'll find registration issues between R G and B on the Epson scanners (as shown here) and noise issues btween B and R channels meaning you'll likely discard them. Essentially the greyscale option is actually the green channel anyway.
An important concept in dealing with negatives is called base fog, this is just jargon words for the fact that a negative is not totally clear.
I've picked a neg made with my 180mm lens to work with. So, lets stick it on the scanner and get into it. In the figure below I've set the range of the scanner to be its full range, and you can see the edges of the 4x5 sheet clearly.

I've selected around the edges to leave a little of the 'clear' glass. I've used the term clear because the scanner is so sensitive that the imperfections in the glass are what is causing that spike over there on the hard right of the histogram. I've deliberately left this here, so you can see clearly the film base and the base fog that emerges later. The base fog of the negative starts to show in the first bump (reading from right to left) and this is pretty much how a neg would look to you sat on a light table.
So, I've now set the "clipping points" on this ready for a scan. Take a look carefully at the numbers and the position of the sliders for black and white points.

Did you notice over on the black level that it would seem I've left a section where there seems to be no data? Well this is because I know that there is likely to be something there that the machine thinks is noise but I know is not. This is part of why I say never send a machine to do a humans job ... the machine lacks sensitivity and experience.
You may also ask why is the black speck of the sun not totally dark. The answer to that as far as I have been able to decide is that even a fully exposed bit of black and white film is not so black that the scanner can't penetrate it ... thus the sun is really exposed and as fully dark as the film can make it. More exposure would not make it any darker.
Note also that I that I did not actually go all the way into the peak of the film base on the right either ... there's a reason for that too, which I'll get to in a minute.
Ok, lets scan it and then have a look in a more capable tool such as photoshop. Lets also invert it and start looking at it as if it was a positive. The peak I've high lighted below in red now (which was on the right) is now on the left (because I've inverted it), so the film base now appears as a fog on the black background of the scanner glass ... this is how it should be at this point
 In this figure you can see that the area on the right which has no data, this is the gap between the brightest amount on the film (before inversion was the densest part) and is not actually fully white ... so I have some room to now adjust that.
Photoshop has some very handy tools for doing this with care, when you adjust levels if you hold down the "Alt" key as you move the slider it shows you the clipping levels by washing the image out to fully black and white. You can even see where dust specks are in this, its one of the most important tools at your disposal for setting these levels. Note: I do this in layers so that I can re-adjust if I need to, when I'm closer I may flatten the image ... I may not.

Here you can see a few things in this negative. One is that my black border is not uniformly black or white, in that it has some amount of indistinctness. This is caused in part by the fact that the base fog is not totally deterministic, it is not precisely one specific level. This is important and it forms the reason why so many scanners software processing of negative works badly. It chops this off and takes with it some shadow details, so now you know why I like to do this myself.
Also I seem to have some problem with some of my film holders, and during exposure some of the light seems to bounce around inside the edges of the holder and reflects of the frame (even though they're black) and exposes film where there should be no exposure. This effect diminishes as you get away from the edge of the holder. This will not be an issue with scanning roll film, and is only an issue for me with 2 or 3 of my film holders.

So now with my levels set you can see the image starting to take form on the screen. You can see that the disk of the sun in the clouds (something you'd likely not be able to do with slides or digital) and you can just see the base fog of the edge of the (supposedly) unexposed film.
So now lets apply some curves to adjust the contrast of this.

I've applied a curve here which lengthens the whites and tucks up the blacks a little bit. The image is now really almost perfect. To check that I have not lost totally everything in the shadows lets have a look in detail at the husks of grass under the snow.

I've added a selection and shown the histogram to assist, but you can see that they are quite dark, but still not totally at base fog. To compare this, I'll show you the "metering" shot I took with my digital (which I use to establish my exposures).
 As you can see (if you click the image you can get a larger view) there is much the same levels there in the shadows, yet there is no way you can even see the disk of the sun or the surrounding clouds in there. This is because I use my digital to pick a setting which is essentially a reading for the shadows. I know that the high lights will fall within the massive range of the negative with its natural compression of high light.
So, there you go ... that's how I handle my negative.
From here one goes about applying some little bit of love to the processing, and its not too hard to turn it into something like this:
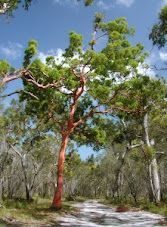
 which is of course another negative from the same day. It was exposed and processed identically to the one above, I just happened to prefer this angle so I put extra work into it.
a quick play with the image which we've just been working through gives me:
this

or this

but I still prefer the image composition from my 90mm lens and the lighting (I didn't expect the sun to come out) so I didn't really put much thought into this particular neg ...
Now, if you are a traditional printer then I don't recommend you do this without taking into account altered development to cater for the fact that traditional printing can not cope with the full range of density which a negative can record. Myself I see this as a limitation of the traditional methods as they fail to capitalize on the full potential of the Negative.
You might find these quick notes interesting too:
- a more detailed examination of scanning Neg as Positive here
- using the Epson for bulk scanning of 35mm colour neg (and getting your desired settings applied across all evenly)
- my colour negative workflow (which is similar)
- registration problems on Epson scanners and why you shouldn't go too far in trying to adjust this or that because when you improve focus you may disturb registration
- using your scanner to understand film density.
- driving your scanner software differently to effect some changes in scanner side exposure on Epsons (meaning better noise characteristics in the dense areas of your negs).
- don't forget colour management on your Epson (its not where you might think it is)
Naturally, as always, feedback and comments are welcome


No comments:
Post a Comment